
As mentioned in our article on planning a new driveway, water is a drive’s worst enemy, so getting the drainage right is one of the most important factors in ensuring a good-looking, long-lived drive. It’s worth considering the Ecological Aspect Of Drainage, too. To help keep local flooding at bay, water should have a path that ideally takes it to the substrate underneath or garden around the drive, rather than shooting straight off the top into the storm drains or sewage system.
Drainage for driveways needs to deal with two main issues: making sure the surface water goes somewhere where it can drain slowly into the ground; and drainage beneath the top surface.
Surface Drainage
To deal with surface water the drive needs to have a gradient, even if the land it is on is flat and level (read Finding Levels on a Driveway Site). In fact, it’s likely to have two gradients, one from the beginning to the end, known as the endfall, and one across the drive, known as the crossfall. Even if the top surface is porous, the rain needs to be directed away from the top of the blocks quickly otherwise Algae, moss and weeds Can Get A Foothold, and in freezing conditions the drive will become slippery and hazardous.
These gradients don’t have to be very step – around 1:60 is adequate – but keeping the surface flat (as opposed to level) while building in a shallow gradient can be a tricky thing to do.
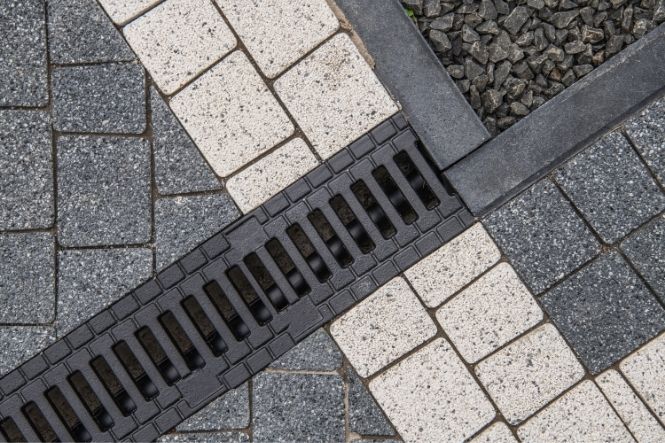
Building Gullies
On a longer drive you might need to consider putting drainage pipes alongside it, perhaps with a grid on top, or perhaps just a small ditch. This is only really necessary if the ground either side of the driveway doesn’t slope away, and there is a risk of water pooling at the sides, making the ground marshy for a long time after rain.
You will need to consider where the drain takes the water away to. Previously it would have been sent straight to the drain or sewer, but these days we are waking up to the fact that it needs to go into the ground on site. So you may need to divert the water into soakaways or a part of the garden, where it can leach back into the water table slowly.
Drainage in the Supporting Layers
Before you’ve done all that you will of course have excavated an amount of soil to make space for the aggregate that will support the top surface. The depth will depend on the type of material you’re using up top and the sort of ground you’re laying the drive on top of, but you’re looking at 100 and 600mm.
For a long drive, you may have to consider drainage pipes at some point. For most domestic drives, it will be sufficient to make sure that the aggregate that you fill the trench with has sufficient gaps in it to allow water to be held up on its way to the ground. But it mustn’t hold it for too long, as this can cause damage, particularly in the winter where trapped water will freeze then thaw, and the associated expansion and contraction will soon cause fractures.
The bedding material that goes over the top of the aggregate and supports the flagstones, pavers or blocks, is usually loose sand or a cement mix. This is a gross simplification; specific details are given in the articles that cover each different surface that you can lay down. But obviously loose bedding will be porous and a cement mix won’t be, so you are likely to have to pay more attention to drainage with a concrete bed than otherwise.
Make Sure you use the Right Materials
One more thing – make sure that you have the correct materials when you’re laying the aggregate and bedding courses. There are many different types of sands and probably many more cement mixes. If you put down the wrong layers, it’s quite likely that a few years of rainfall will see your new drive disappearing down the hill. If you’re unsure of this, then it’s time to call in a professional.
