
If you have a concrete driveway or any other concrete surface then this material can look a little rugged and rough without the proper treatment. For some people, this aesthetic is more than pleasing but for most of us, something more uniform and smooth is definitely the way forward.
When you are working with wood, you would use a sander to buff the surface and leave it with a quality, visually appealing finish. Of course, you can’t use this type of tool on concrete but there is another method which delivers similar results. This is known as concrete sanding and makes use of diamond abrasives that are designed to work with this much more robust material.
If you want to polish your concrete and leave it looking amazing, this guide is for you. We have put together some easy instructions to help you get the job done quickly and efficiently.
Table of Contents
What Are The Benefits Of Polished Concrete?
Polished concrete is becoming more and more popular in both domestic and commercial settings and it is little wonder when you consider its many benefits.
- Polished concrete is highly resistant to stains and so you will end up with a much more visually appealing surface for longer. It is particularly resistant to oil which can be problematic on surfaces like driveways.
- This type of surface is highly reflective and can help to make an area appear much lighter. This is one of the reasons it is so often used for industrial purposes but in a residential situation, this can also be a huge benefit.
- Sanding concrete to give a polished finish will lower the amount of maintenance required over time. This is owing to the fact that this type of surface does not suffer from efflorescence.
- While polished concrete may look shiny, it’s texture is quite the opposite meaning that this is a much more slip resistant surface.
- The sheen of the polished concrete is permanent. Where maintenance in terms of repairs is lower, you will also find that you do not have to reseal or repolish the surface once it is complete.
What Will I Need To Do Concrete Sanding?
It is possible to complete concrete sanding as a DIY project, but you must keep in mind that you will need some specialist equipment.
- Concrete sander (this may also be a polisher or grinder)
- Abrasive discs
- A chemical concrete hardener
- Stain guard or sealant
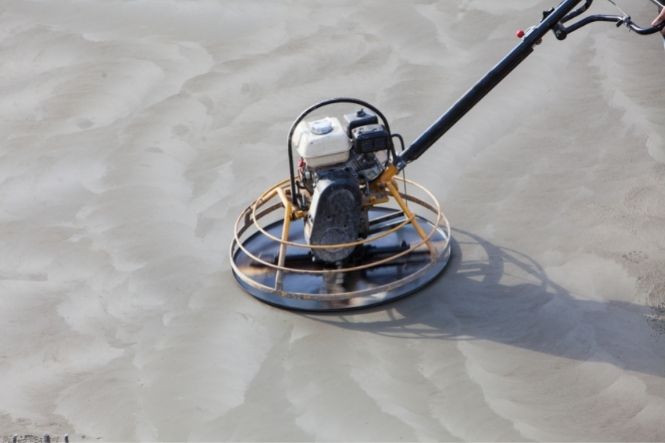
How To Choose The Right Tool
It is not merely enough to gather your tools and hope for the best. When it comes to choosing a concrete sander, you need something very specific and your regular sander will not suffice. While these tools can come in various forms, many of them resemble the industrial floor polisher. The tool features a disc which rotates at the base as well as handles for the user to guide the tool. That said, there are a variety of handheld tools which may be more suitable for smaller areas.
If you head to your local DIY store, you will be presented with an array of concrete sanders and there are options to purchase or hire them. If you are going to be doing some extensive work, it may be wiser to put up the initial investment and buy the tool. However, for smaller areas, it’s worth looking at the cost of hiring.
When choosing your concrete sander, you must make sure that you are getting the right piece of equipment for the job. Of course, it can help to speak to the sales team who will be able to offer you the best advice and as with any tool, cheap doesn’t always mean good. You should also bear in mind that some concrete sanders are designed to work with wet surfaces while others are designed for dry sanding. The type of concrete sanding that you intend to complete will determine the best tool for the job.
Step By Step Guide
Now that you have all of your equipment ready to go, you can get down to work. But there is much more to concrete sanding than first meets the eye so make sure that you give yourself plenty of time.
Preparation
The most important step in any job is to get prepared. Rushing in to complete the work will only end in disaster to be sure to take the time to inspect and prep the concrete before you get started.
Inspecting The Area
One of the first things you should check for is whether the concrete surface has any imperfections; these might be in the form of cracks or holes. If there are any marks like this then you will need to fill them using an epoxy. Allow these to dry completely before doing any more work on the concrete.
The hardness of the concrete will tell you a lot about the type of tools you will need to use. Moreover, it’ll determine how much time the work will take as different levels of hardness will require different amounts of time to effectively smooth down. The most effective way to test the hardness of the concrete is to use a MOHS hardness pick set or a digital set like below

- 【LCD DIGITAL SCREEN】: This 100HD A durometer with LCD digital screen, which is easy to read, the...
- 【STABLE PERFORMANCE】: The shore rubber hardness tester uses helical spring to forward to ensure...
- 【WIDELY APPLICATION】: Our digital durometer scale is suitable for general rubber, synthetic...
Testing the area using various abrasives will give you a good idea of how hard or soft the concrete is. You will find that softer concrete won’t require quite as abrasive tools and will be far less time consuming. However, you should keep in mind that you will need to apply more care and attention to avoid removing too much of the surface.
Before you begin sanding, you will need to clean the concrete surface but the good news is that you don’t necessarily need any special cleaning chemicals. In most cases, you will be able to use a regular detergent with some clean water. The only exception to this is if the concrete is particularly stained or dirty. In this case, you may need to use something a little stronger such as hydrogen peroxide..
Getting Ready
The next part of your concrete sanding preparation involves making sure that yourself and the surrounding area are well protected. This is not a ‘clean’ job and you will get into a mess so it is better to be prepared for this now rather than having a bigger clean up operation at the end.
How to prepare for the mess will vastly depend on the type of concrete sanding you are doing. For example, if you are using a dry sanding method, then there will be a lot of dust produced. Now, how much of this will end up around you will depend on the type of grinder you are using and whether it features a dust collection bag. But even if it does, there will be some that escapes. In any case, we strongly suggest you wear the correct PPE which will include eye protection and a dust mask. If you are worried about your clothing becoming dusty, there are dust suits out there that will offer adequate protection. Some people also like to use ear defenders owing to the loud noise created by the grinder.
On the other hand, you may have decided to opt for a wet sanding method. In this case, there won’t be any problems with dust but there will be a wet byproduct that will need to be dealt with. This is a mixture of water and dust which will harden as it dries out; think of it like cement. Once dried, this can be incredibly difficult to remove, so you will need to make sure that you have covered any areas that you want to protect with a plastic cover.
How To Use The Concrete Polisher
No products found.
When it comes to sanding concrete, you must keep in mind that this is a very dense, tough material that requires heavy duty abrasives if you want to even begin to make a dent in the surface. You will notice that the available discs are either diamond or non-diamond. Always go for diamond discs as these are much coarser and have a far greater ability to grind robust materials like concrete.
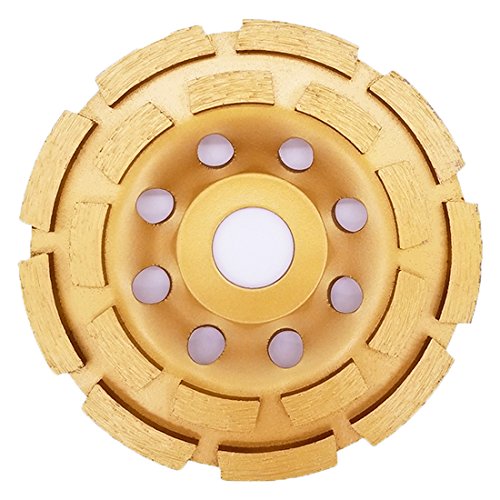
- Double Row Segmented Diamond Cup Wheels are designed for grinding concrete and field stone
- Suitable for grinding machines and angle grinders
- The double segment configuration allows for faster material removal
Grinding discs are always numbered and these numbers indicate how coarse or fine the abrasive is. The higher the number, the finer the disc will be. In the initial stages, you will be looking for a lower number that is quite coarse. However, to put the finishing touches to the concrete, you will need finer discs down the line. But it is no use quickly changing from one coarseness to another, this is a process that takes time so be sure to use each disc as much as necessary before moving on. It is better to invest the time now than to have to make adjustments and repairs down the line.
To begin with, we would suggest using an 80 grit disc. That said, if there are serious scuffs on the surface of the concrete, you may need to go for something coarser like a 40 grit which will take these right out. You can then move onto the 80 grit; or just go straight to this if you’re lucky enough to have a totally stain free surface. You should start in one corner and work your way to the other; we would also suggest working perpendicularly after each disc change. As you move through your grinding discs, you will be looking to end up at a 400 grit which will allow you to bring the concrete to a beautiful shine.
Safety Considerations
When using any type of powered tool, there is always a risk of accidents or an injury. However, by following safe practices, you can ensure that you don’t fall victim to these. Of course, one of the first things you should do, as a matter of course, is to read the user manual that comes with your concrete sander. This will allow you to learn the correct operation as well as how to do things like safely change the discs.
You will also want to perform a risk assessment of the area prior to switching the equipment on. This might include hazards that could cause an electrical short circuit, any areas that are too poorly lit for you to safely work as well as checking for obstructions and other people around the workspace.
We have already touched on some of the protective gear you should wear. But in addition to ear defenders, goggles and a dust mask, we would suggest also wearing appropriate footwear. This should be closed toe and should have an excellent amount of tread to ensure you do not slip, especially when working in wet areas.
Before using the sander, be sure to inspect all parts for damage, wear or those that may be loose. All guards and safety equipment should be in place and fully functional. Even once you turn the tool on, you should remain vigilant and be on contrast alert for unusual noises or vibrations. In the event you notice anything, stop immediately.
You should not put yourself into an awkward angle as this may affect your ability to control the grinder. Instead, find a comfortable position and never try to overreach.
Liquid Chemical Hardener
One of the biggest benefits of polishing your concrete is that it gives it much greater durability. However, this can only be truly achieved by using the correct products. There is some level of dispute over whether this step is necessary but if you are working with very porous or old concrete, we would say it is a must.

- PREMIUM QUALITY – Made from high-quality silicate resins that are suitable for hardening and...
- ADAPTABLE – Ideal for concrete and cement-based floors in garages, workshops, industrial units and...
- FAST ACTING – Leaves a residual surface coating that stops dust from forming. Dries clear in just...
In this case, you will need to apply a liquid chemical hardener which is more commonly referred to as a densifier. Usually, these products are applied using a spray but if you prefer, there are other ways you can do this such as a large broom or brush.
When you apply the solution will largely depend on the hardness of the concrete. For example, if the concrete is not super hard, you should be able to apply the densifier after using your 80 grit disc. However, if it is a little harder, you will want to wait until further down the sanding process, potentially after using the 200 grit disc. Be sure to allow the liquid to dry before you carry on sanding.
The Finishing Touches
Now, how you proceed from here will depend on the look you wish to achieve. There are some people who want a very high gloss finish and if this sounds like you, then you will need to go for a 3000 grit disc, at least, which will bring the surface to an impressive sheen.
When you are finished, you will need to remove any excess dust which is most easily done using a vacuum cleaner. You can then apply a concrete sealer for added protection and durability.
Conclusion
If you have a concrete driveway or any other concrete surface, you will know that this material can look a little dull and, quite frankly, unattractive. But the good news is that by doing concrete sanding, you can breathe new life into the surface and leave it looking shiny, polished and visually pleasing.
While you will need special equipment, this is readily available and the process of concrete sanding isn’t a difficult one. That said, it can be time consuming so do be aware of this before getting started.
